Friday, 31 December 2010
Leather Christmas Creation's
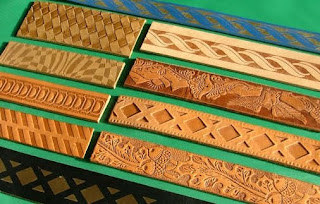
Making them yourself gives them a little more of a personal touch. I thought I would use my new found skill of leather tooling to achieve this.
Here are the results, which i think were quite successful.
Leather coin Purses(Toggle lock);
Clan coaster;
Oak Napkin rings;
Key fobs;
Leather Coin purse(Velcro);
What do you think?
Saturday, 27 November 2010
How are brain defines us and our environment
Neuroanatomist Jill Bolte Taylor had an opportunity few brain scientists would wish for: One morning, she realized she was having a massive stroke. As it happened -- as she felt her brain functions slip away one by one, speech, movement, understanding -- she studied and remembered every moment.
http://www.youtube.com/watch?v=UyyjU8fzEYU
Healing Earth
http://vimeo.com/16812713
http://www.ashtarcommandcrew.net/video/kiesha-in-zurich-please
The tribe of many colors
http://www.tribeofmanycolors.net/
Saturday, 20 November 2010
New Skill Tooling Leather(in progress)
Things you need:
-Vegetable tanned leather or what is called tooling leather to make embossed leather- This type of leather is softer and easy to work with. Most briefcases, saddlebags and leather items are also vegetable tanned leather.
- chisels
-wooden mallet
-Leather scissors
- Leather Dye or Leather Paint
-tracing paper
-hole punch
-leather sealer e.g. Super Shene
Optional:
-pointy stick for burnishing
-stamps and molding tools and stylus
Process:
Select your leather
Usually, tooling is done on "top grain" leather, the type with a smooth side (the natural skin surface). And it is best done on vegetable-tanned leather that has not been oiled or waxed in any way, so it's still pinkish or flesh-coloured.
If you're not sure, as always Test. Wet a corner of it and try making lines with various items like the back of a table knife, the edge of a penny, things like that (not too sharp or pointy). Does it keep the line?
Cut your leather pattern
Standard scissors are not going to cut though anything but the thinnest leathers. Use specially sharpened scissors.
Point that varies among the folks giving tips: Some like to dye the whole piece of leather now. Others wait until it is shaped and carved and then do all the dying at once.
Trace the pattern
First Decide on a design and draw it onto tracing paper.
Position the tracing film onto the right side of the leather. Trace over the pattern with a ballpoint stylus or empty ballpoint pen. Press firmly. Trace all the lines. You may need to dampen the leather a little with a sponge and water if the leather is very hard.
Remove the film. The design should be replicated on the surface of the leather.
Then Trace over the outline with a knife.
You may also wish to Punch the holes or slots for sewing now.
Dampen the leather
(Here is where opinions vary from folks)
Smaller projects you can use wet sponge or wet rag.
That's why you soak the leather through and leave it for 30 minutes (less for smaller pieces) , laying on a flat surface and then go tool it. That way it will still hold the form when you mold it and it will hold the design but not be too waterlogged.
Too wet it does have a tendency to revert to "flesh" so it might be a little too malleable. Let dry a bit.
Warnings:
- If you've soaked the whole piece, don't let the leather dry out while you're working with it. (it will shrink) Later you will let it dry by stretching it over your molded shape.
Burnish the leather - optional
Burnish the leather with a metal burnishing tool or a wooden pointy stick.
This will help the longevity of the pattern.
Carve and stamp
Carve your design into the leather without cutting it. (Cut are only used very sparely.)
You will to use the chisels and a sharp knife to shape your design but try not to cut into the leather. A stylus will allow you to draw lines.
Some people suggest to use stamps and various molding tools but you can get away with chisels and knifes.
The stamps are hammered into the leather with a mallet. A rawhide mallet is best but you can also use plastic. You do not want to use a metal hammer. That provides too much pressure.
You must be careful when you are tooling a large section of leather. All that pounding and cutting and wetting and pounding can end up stretching your piece of leather so that it no longer correctly fits. Tape or glue something to the back side of the leather to keep it from 'growing' out of size. Most basic leather books mention this but time and time again. people run into problems with fit after the careful work in the beginning.
Dye the leather
After you've carved your designs, you may wish to dye the pattern you have just tooled or, it you have not yet dyed the whole hide, now is the time.
Be use to wear gloves and protect your surfaces.
Practice first so that you can see how the dye flows and absorbers into the leather. If you dye before the pieces are cut, then your cut edges will show a lighter/undyed colour.
Dyed leather will tool differently and, if you're going to carve it, the gouge will show a different colour than your dyed surface. However, you might like that look, so try things out on a test-dyed scrap first.
When doing a large surface, use long smooth strokes. Even better, if you've got it, use an air brush.
Recommended dyes
- Fiebrings Leather Dye
Finish the edges
Smooth and slick your edges to a polish. Edges that are not finished over time will look frayed and worn.
Mold It
If you are doing something that needs shaping, stretch the leather over the mold and lace it in place. This could be your cardboard and duct tape mold. It could be a paint can for the vambraces... etc.
You may do more cutting and punching at this point.
Additional painting of the design may be done at this point.
Paint recommendations
- Cova Colour paints
- Tamiya acrylic paints
Let dry at least 24 hours.
Seal it
When you are all done, the leather needs to be sealed to protect your work and keep it from the damp.
- Sealer recommendations
- Super Shene
New skill embossing leather (in progress)
Things you need:
-Vegetable tanned leather or what is called tooling leather to make embossed leather- This type of leather is softer and easy to work with. Most briefcases, saddlebags and leather items are also vegetable tanned leather.
-Embossing tools homemade or bought or chisels
-wooden mallet
Optional:
- Leather Dye or Leather Paint
Process:
-First wet the leather to make it soft. Do this by soaking it with wet rags, or use a steam iron and steam the leather carefully. Like good old Walt would tell you, It will be soft just like butter.
-Lay the leather over a sturdy workbench or table. You’re going to be pounding the leather so don't use your fancy kitchen table!
-Mark the area on the leather where you want your designs, initials or whatever with a pencil. Tracing where you want the embossing to be is much better than guessing. For names or initials use a ruler and draw a straight line where the bottom of the letters should be.
-Place your design or letter die tool straight up on the leather where you want it on the side of the leather you want it to show. Taking a wooden or rubber mallet hit the top end of the die tool sharply. It does not have to be too hard, just solid sharp taps.
-Tipping the leather embossing die tool slightly all the way around as you tap it will make sure the edges of the design are impressed in the leather well. Once done go to the next spot and use the next leather embossing die tool.
-To use a leather embossing wheel make sure the leather cannot move. Place the wheel where you want to start, press down firmly and roll it along the leather. Follow the leather edge to make a pretty border, or follow a pencil path on the leather to make loops and shapes.
Dying and painting your embossed leather
-Once you have your embossed leather designs, initials or patterns in your leather item, let it dry overnight.
-Then if you want you can add colour to your embossed leather designs. Use leather dye or leather paint to fill in your embossed work. Most leather briefcases and other fine leather items that have initials embossed into it have them coloured a nice gold or silver.
-Once that is dry finish it with a leather sealer to protect it from dirt and make it water resistant.
So that is how to do leather embossing! It's fun and can make a plain leather briefcase, belt or wallet look much better with embossed leather designs or initials.
FYI:- embossing leather doesn’t involve cutting into the leather. Cutting into the leather is called tooling leather.
Meaningful crafts
http://www.madamefortuna.com/relic_victorian.php
All the Relics are delicate hand-blown glass globes that contain a meaningful object - a Victorian die-cut, a petit-point rose, a scoop of red soil or yellow coral, or my favorite, an exquisite little feather from a robin, peacock, or cardinal. The prefab pieces are seriously breathtaking, but
Madame Fortuna will also custom-make a Relic from the tiny object of your choice-Hair from a loved one, dried petal from a bridal bouquet, soil or sand from a sacred place?
Madame Fortuna puts an elegant new spin on the time capsule.
Could leather objects be made incorporating some special object to the owner- a stone from the river where they used to play as a child, a piece of wood from the forest they grew up next to or soil from the land they grew up on.
How much is that?
The real question that seems to come up is how much are things worth? Crafts and the skills to make them are very much undervalued, but how do you change this when people want things to be as cheap as possible?
Curious?
- Unusual, not necessarily practical but acts as a talking piece or nostalgia
Story telling?
- Paying for not just the object but the stories and history behind it
-Memories for the buyer
Experience reminder?
-paying for an object to remind them of something they did or visited e.g. post cards or stamped coins at the gift shop
One of a kind/ Individuality?
- says something about the buyer of the object, exclusive, makes others want it
Fad/popluar?
-Everyone who is cool seems to have one
Customisation/Personalisation?
-allows the buyer to pay for extra service for a specific detail or allows them to be a part of the making process and creates attachment to them
There is nothing like getting a hand stamped letter
Engraving personal journey
I think it would be great if we could say more about ourselves and share our stories with others if we made our own clothing and customised it.
That satisfaction of when you make something and can say to someone "I made that" , is such an amazing experience.
After scouring the internet I found this painting based on the famous story belt by Chris.
"The joy of life comes from our encounters with new
experiences, and hence there is no greater joy than to have an
endlessly changing horizon, for each day to have a new
http://heatherhortonartwork.blogspot.com/
Heather has really captured the belt perfectly in this painting and really expresses how creative a person Chris was and manifests his inward vision out into the world. He didn't allow himself to be restricted he expressed his inner thoughts in the way he lived.
Which I think is what is great about learning skills, It gives you the chance to bring your dreams and inner thoughts into much more vividly using a wide range of media. Learning old crafts and skills gives you such a big pallet of media to paint your ideas much more vividly and bring them into the physical world, to share with others.
Learning old crafts and skills really open your eyes, mind and for a second allows you to think and feel like the people of the past as you try to solve the same challenges.
I've found it can be a real challenge finding the resources such as the right leather and also the old skills to undertake such a task but it really adds to the feeling of success once it's finished.
Friday, 29 October 2010
new skill: Insulating lofts
Sunday, 24 October 2010
Origins
I was born In Aberdeen Hospital at 1am on the 20th of March 1989
Here is a photo of me in the hospital with rather spiky hair ( I think its a good look)
Apparently when I was little I didn't sleep very much as there was so much to see and do, sorry Mum and Dad
( still rocking the spiked hair do)
My childhood was very happy and I spent allot of it outdoors
whether it be smelling Roses with my Grandad
Out playing with my best friend Richard
Climbing Trees
Or out surveying the land with my dad
From a young age Ive always liked to make and build things, here I am out with my dad helping
( or more likely playing with the sand) my dad build a log cabin. This love of making and mending has lead me to projects in my adult life.
Ive always had an adventurous side and loved going on little adventures with my dad when I was young which eventually lead me to travel around the world
I loved playing in the garden at a young age and loved growing plants with my Mum even though I didn't realise how much I was learning at the time, I saw it as just having fun.
As you can see my parents tried to make me aware of the planet from an early age and taught me to care for it and many other valuable morals.
Here I am at a fancy dress party while others were dressed as farmers and Bees ( my best friend Richard)
I went as Save the Planet,I thought it was a great costume but I dont think the other kids really understood.
Here me and my best friend Richard are at the falconry Center with my home made binoculars (a little bit of ingenuity)
Here I am looking rather thoughtful as I contemplate over my parents choice in music
Here I am practicing car sharing
Although I think I prefer bikes
Its amazing how much childhood shapes the way you grow up and the smallest seeds of interest lead you to opportunities as you become an adult. I can safely say I had a wonderful childhood and look back on it with very fond memory's.
Thanks Mum and Dad